First 12 things you should do after installing WordPress

So you finally decided and bought yourself a little space out of this internet ocean. Congratulations on choosing a domain, selecting a hosting company and installing WordPress! It seems like ages have passed making all of this work, doesn’t it?
Well, you can certainly reward yourself with a slice of cake and a nice cup of coffee for coming this far.
But after that, we’ve still got a lot of work to do. Now don’t panic, and most certainly don’t become overwhelmed, that is one of the biggest mistakes new bloggers make.
You can only do one step at a time, no more than that. Eventually, you will come through those steps. So let’s get to it.
1. Change your site title, tagline, and timezone
To do this, open your WordPress dashboard. Go to settings > general and enter your data. See my example below.
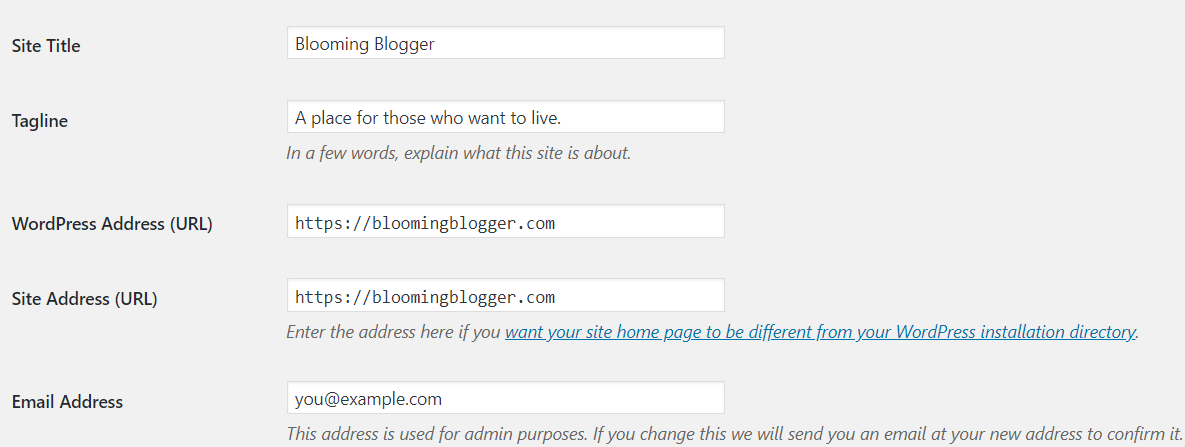
A tagline is nothing more than a description of your website. It is visible as something that lets your audience know what your blog is about. I picked something quickly for myself but I’ll take time and change it eventually.
Now notice that my URL starts with https instead of http. You’ll want that, too! That means your site is secure. You probably don’t have that yet. Leave it as it is and you’ll add the ‘s’ after your site is secure. More on that later.
Change your timezone to your specific area. I, for instance, am from Slovenia but I just checked Berlin as my location since it is from the same timezone so no worries here. After I officially move to the UK, I’ll change that, no biggie.
Click on the Save changes.
2. Change your permalinks settings
Go to settings > permalinks and choose the option that is suitable for you. I strongly recommend you go with one of the last two options.
I, for now, have chosen a post name option (it is the most SEO friendly and most recommended one) but I am thinking about switching to Custom Structure despite that.
Look at the link of this blog post, that’s a permalink for this specific post. It’s definitely better than some numbers and dates but I still think it can be too long sometimes. If I went with custom structure, I would atleast simplify it a little bit.
When you select your option, click on the Save changes.
3. Change ”admin” username
I would not want you to learn how to use WordPress and build an epic website only to fall victim to hackers.
This setting will protect you from malicious insecurity issues targeted towards your site.
When you install WordPress, the default username is ‘admin’ and this needs to be changed to something people cannot guess to reduce the success of bots attacks and login attacks.
For security purposes, you need to change this to either your business name, personal name or any other name that fits the aim of your business.
To do this, go to Users > Your Profile.
As you can see in the username field, it says ‘admin’. This cannot be changed. So we are not going to change anything on this page.
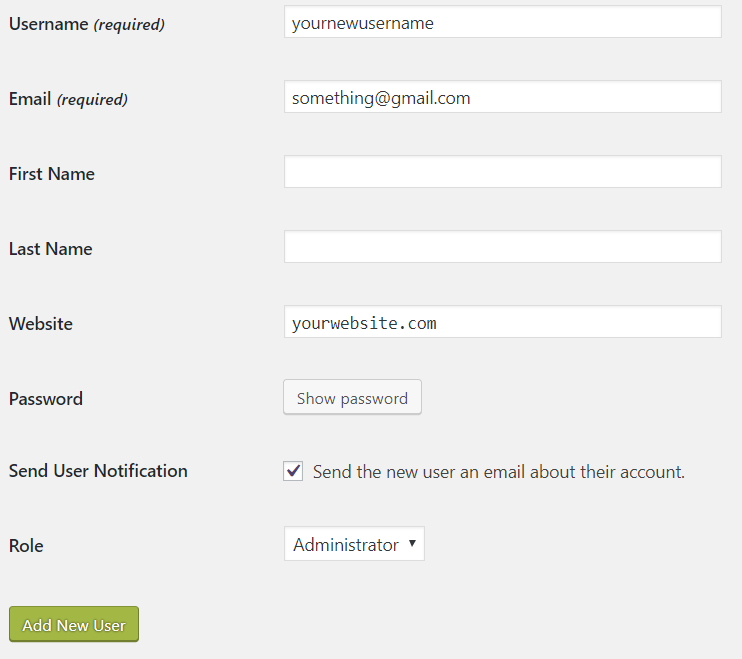
That is why you have to add a new user and set yourself as an administrator. To do this, go to Users > Add new and choose your username, enter your email, choose a strong password and fill out other required fields. It is important that you set your role as an administrator.
After you fill ou the fields, click Add New User.
At this point there are two users, admin and yourself (a new user). Now you want to log out as admin and log in as yourself. Go to the top right corner and log out. Next, you want to login with your new username and your new strong password you just created.
Now, you can go to Users > All users and simply delete the admin user. We wont need him anymore. You’re the one who is in charge now! 🙂
4. Configure the reading settings
You want your site to be user-friendly and attractive to your customers, right?
I thought so.
This setting will help you to determine what will be displayed on your website front page, such as blog posts page, homepage or any other page on your site. A blogger usually has the blog page as the front page while a company use the home page as the front page. Decide for yourself.
See my example of a front page. Like everyone else, I have my own style and this is just the way I like it for my blog.
Go to Settings > Reading
In the image below, you can see my settings. I have chosen a static page where you can choose a category, short about me section, a call to action but I also included latest posts from different categories and social follow section. All on one page.
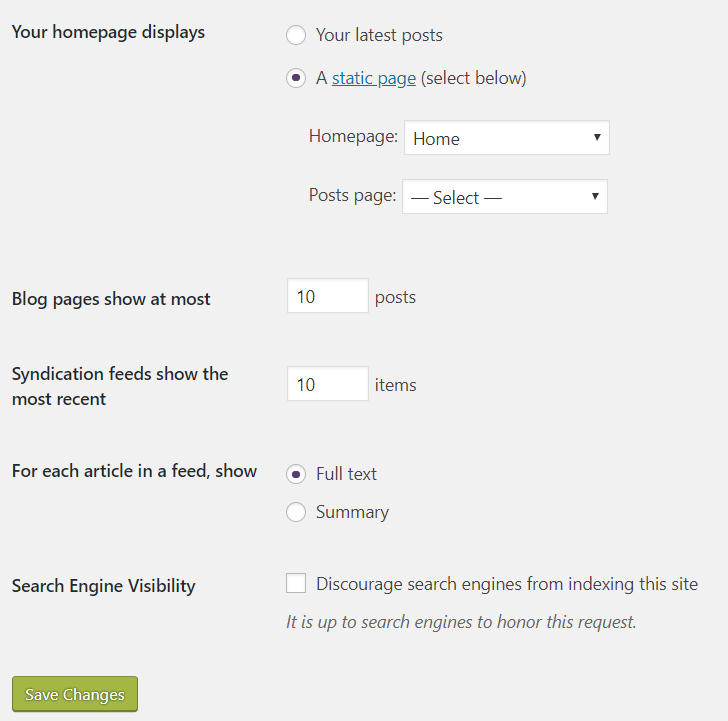
If you dont like it that way or you simply want to have a blog on your front page, then select ‘latest posts‘ instead of ‘static page’
After you finish, click Save changes.
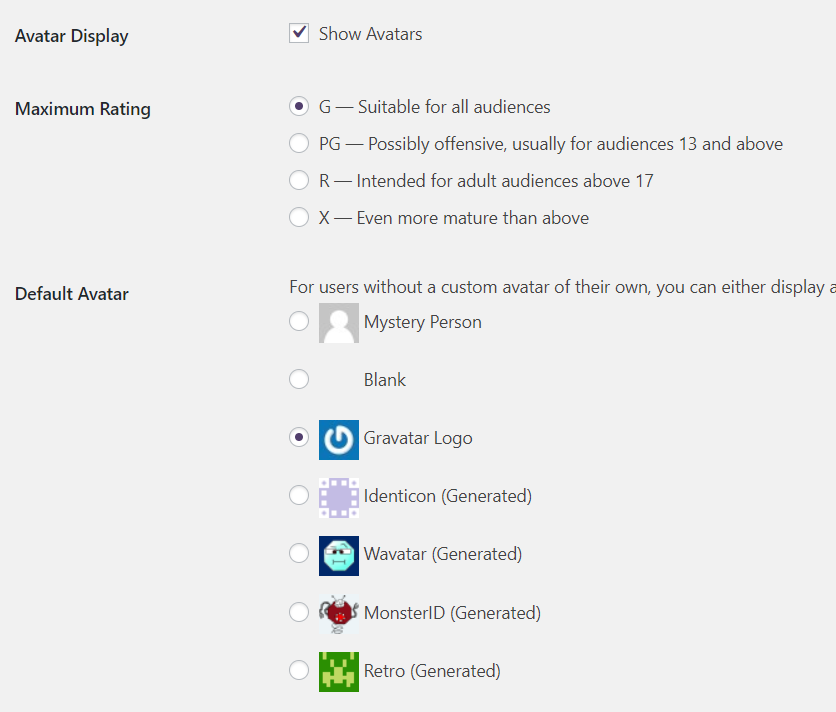
5. Configure the discussion settings
These settings will help you to define several guidelines related to discussions on the content on your sites, such as comment settings, article settings and gravatar settings among others.
In most cases, the default settings are perfectly fine to go with and you don’t need to change anything. However if you do want to change settings, simply check and un-check whatever you like. Below is my own example of how I prefer it.
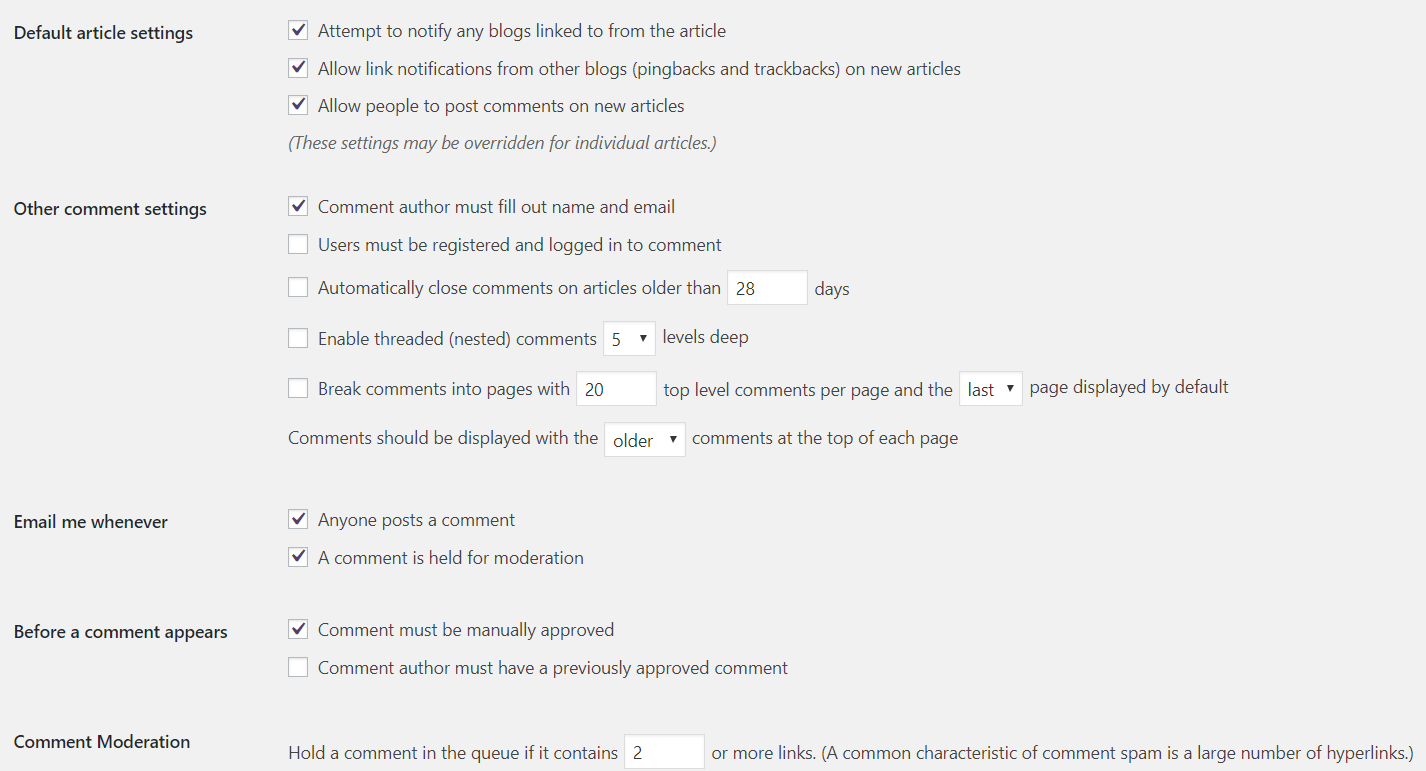
After a while I plan to make some changes, for instance
I’ll switch from ‘manually opproved‘ to ‘must have a previously approved comment‘.
I’ll come back to check the box ‘Automatically close comments on articles older than 28 days‘
6. Install a WordPress theme
You have a variety of themes to choose from. Take your time to figure out what is it that you need in your theme, what do you want it to look like, do you want to have a magazine, photography portfolio, shop,…?
This was my number one struggle because there was so much to choose from and I was feeling pretty lost. There is a ton of free WordPress themes and there is also a ton of paid WordPress themes. I didn’t know what is the right decision.
A free theme is available for use without paying a single cent to access it.
There are many places you can download free WordPress themes, such as WordPress.org theme directory and FreeWPthemes among others.
The advantage of using free themes is that you incur no cost, you can quickly change to another, and there are many options to choose from out there.
However, the disadvantage is that most are bloated and bad for SEO due to uncorrected bugs, they lack support, and have limited customization options.
This is not to say that all free themes are bad, NO! NO! There are many good ones out there, but you will need to do in-depth research and analysis or get trustworthy recommendations before.
Personally, I didn’t want to lose time with such research. So I invested in my blog from a start. I purchased a Divi theme, the most customizable theme ever made. I was lucky actually that my 30th birthday was at that time, haha. So my family gathered money to pay for it. I hope you’ll have the same luck as I did!
You see, the best thing about the Divi theme is that it has a drag and drop builder. You can literally do anything You want from scratch without any coding, but if you don’t feel like it there are many beautiful templates for you to choose from.
You can read more about it in my post here, where I jump into detail of what it can do + I made a list of top 20 free WordPress themes I would totally go for if I didn’t have the money at that time + top 10 extremely affordable themes I would choose if I didn’t know about Divi.
Now let’s assume you have chosen a theme. Go to Appearance > Themes.
Important Note: Before adding any theme, delete all the default themes you find in this area by clicking on the link “theme details” and then on the “delete” link below the theme details page, and finally select “OK” to finalize.
After you have deleted all the defaults themes, which come pre-installed in WordPress, it is time to add a new theme.
To add a new theme go to Appearance > Themes > Add new
On the other hand, if you have a theme from elsewhere or you bought a theme, you can add it to WordPress by clicking ‘Upload Theme’ button.
After you’ve added the theme, click on the “Install” button then “Activate” on the new window that appears.
7. Install plugins
Before you can install any plugin, I strongly recommend that you delete default and unused ones, which come pre-installed in WordPress.
To delete a plugin, go to Plugins > Installed Plugins, and click on “deactivate” it first then “delete” it.
To install a plugin, go to Plugins > Add New and write down your wanted plugin in the search bar to find it. After you find it, click on Install now. Then go back to your list of Installed plugins and activate it.
Want to know which plugins are essential for your blog? Here is the list of 20 must-have plugins every blogger should install + a description of each plugin (don’t worry, it is easy to understand it even if you’re not tech savvy)
8. Set WordPress menus and widgets
Menus are navigational links that help users to move around your site, while widgets are containers that pull together common content that is put in certain areas of your site, such as recent posts on the sidebar.
See my example of one of the menus below. This one is called a primary menu:
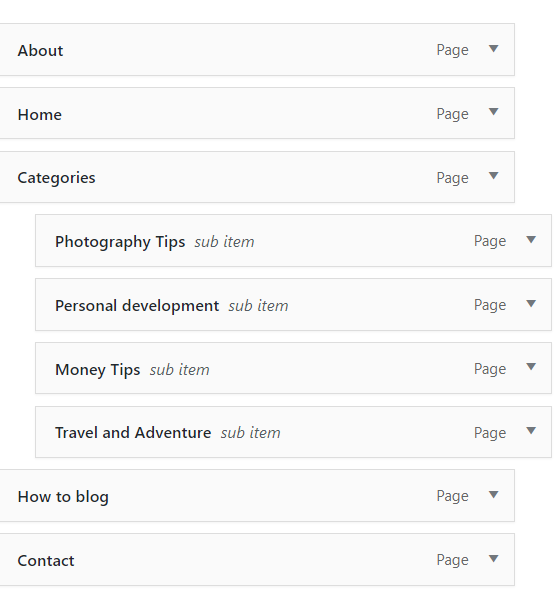
You also have a Social links menu (on the very top of a page) and Footer menu (on the very bottom).
To add a menu, go to Appearance > Menus and on the left you have a list of menus. You can select one of these and click Add menu. But note that before you can even have a list of menus, you have to create a few pages.
Here is the super video – The ultimate WordPress menu tutorial (2017) that explains how to create and manage menus. Certain steps are much easier to understand in a video form. Even for me even though I am more of a reader than anything else.
For managing widgets, see this video – WordPress Widgets Tutorial
9. Add posts and pages
Pages are static content entry points, such as home, about, services and hire me pages.
These are good for content without a time value and do not need regular updates.
On the other hand, posts are blog updates that are arranged in chronological order from the latest to the oldest. You should watch this video Pages vs. Posts In WordPress: What’s The Difference?! Here it is well explained the difference between post and page.
To create a WordPress post go to Posts > Add New and follow the instructions from this video.
To create a WordPress page go to Pages > Add New and follow the instructions from this video.
10. Brand your site
When I say branding I mean how are you going to represent yourself to people, to your targeted audience?
The first thing that comes to my mind is Logo. I created mine with Canva. It’s free (with paid version which I don’t need for now), awesome and super easy. You can create any type of images. I use it for almost every blog image and for ALL of my Pinterest graphics.
Then you should create a Favicon for which I also used Canva. It is a little small icon that appears above this page, in my case, it is a little butterfly. Favicon is essential because it helps readers to memorize your website and it allows them to bookmark your page only with favicon.
You’ll also want to have a Gravatar. It is a small image that represents you whenever you leave a comment somewhere online. I suggest that your face or your logo is on the image. Leave a comment to this post, and you’ll see yours. If you don’t have one, a Gravatar company logo will appear instead of your own image – a capital G.
Have a color scheme. Let it be out of 2-3 colors that you like and go well together. Mine is a combination of turquoise and light watermelon (I made the name up, can’t tell what the color is haha). Any suggestions maybe?
Typography: choose 2-3 fonts and sizes that suit you best and stick to that throughout your entire blog. Don’t spoil your website with too many different fonts, for the love of God, just. don’t. do. that!
So here are all the tutorials you need:
Favicon: how to add a Favicon to your WordPress
Logo: how to add a logo to your website
Have a color scheme: Use this video to learn how to complete this step.
Create your gravatar: Use this tutorial from WordPress to complete this activity.
Typography: This has everything to do with font types and sizes. Gather a few tips from this article that will help you to brand your site.
11. Optimize for SEO
SEO is the process of making a website rank higher in search engines, which results in free traffic to that site.
Why is SEO important on a WordPress site?
- Source of Free traffic from search engines
- Improves the usability of a website, which increases brand loyalty and sales.
- Puts your business ahead of the competition
- Better SERP rankings equal high brand authority, customer loyalty and credibility.
How do you optimize a WordPress site for SEO?
- Use an SEO plugin, such as Yoast SEO
- Use keyword research best practices
- Carry out on page SEO best practices, such as write good content, user-friendly URLs and image optimization among others, consistently in everything you do on your site
- Take your SEO game to the next level by doing off page SEO best practices, such as link building and content promotion among others.
12. Make your website secure
(with a green padlock on the top left corner of your URL)
This is a trickier part. You need to have an SSL certificate enabled on your site. It most certainly depends on your hosting company. With Bluehost, you get this certificate for free and some other hosts also. You should check with your hosting company if you get it for free or not. I know a lot of people buy it for about eight bucks a year.
Anyway, after a little research, I found a way how you can get it for free, and I’ve tried it on other websites so I can honestly say it works perfectly OK. See the tutorial here on how to get it for free. It was one of the most informative videos/tutorials. I just followed the steps from this video, and things worked perfectly.
The important note here: You must also Install plugin Really Simple SSL and activate it for everything work properly.
So what now? Shall we get to work?
WAS THIS ARTICLE HELPFUL?
Then I have a tiny request from you. Show me some love and this content. I’ve made a pin for you, too 🙂 ↓
Please share it with others because they may find it helpful, too. Thanks, you’re wonderful!
Whatever you do, don’t try to do everything at once. Save this post and come back to it because you can’t do everything at once, it can be too overwhelming.
Make a few steps today, then come back tomorrow and make and make another step. Eventually, you will set everything up, just be patient. Anyone who says it is super easy doesn’t have a clue or makes a pretty good liar.
Be realistic from the start and you’ll go far. Be ready for challenges and overcome those. Because creating a website is not a piece of cake
blogging = hard work
It takes time, patience, effort and consistency to make it work.
But after a while, things start to go smoothly. Then you’ll look back and you won’t believe how much you’ve learned in the past few months.
The funny thing is that most days you will feel like this blogging thing doesn’t move anywhere and that you didn’t learn anything. Things will appear so messed up.
But suddenly everything will start to become clear and come to its place. Trust me, I’ve gone through this. I am not ashamed to say so but I’ve cried many times because of frustration when something didn’t work and I didn’t know where the problem might be.
Just don’t give up and keep up the good work!
What is your number ONE struggle right now? What is it about blogging that worries you the most? Let me know in the comments below and let’s talk more! I would love to hear it from you.


Hi Dee,
This is a simple and good layout.
I see you have been using pinterest in your post too.
Does it help to have an pinterest image directly on your post? especially when you are starting as a newbie?
Yes, I think it is a good idea to always have a pin image on your post. I try to include these images everywhere possible, especially if Pinterest is your main source of traffic.
Dee I am so amazed by this post and your page. This is exactly how I feel and want to do for older women. I always want to find the answer and to help people. I have not actually started because as you said I got sooo overwhelmed. Not the most tech-savvy but want so badly to make this happen. I’m gonna jump back in again. I retire in 8 months and I want this to be my post retirement gig of helping women.
Sometimes it can be confusing to know what exactly to do or where to start after installing WordPress. Luckily there is already an article that explains the 18 most important things to consider after installing WordPress at https://wpseonoob.com/most-important-things-after-installing-wordpress/
This is very useful guide for a wordpress user. This may help people to follow tips. Thanks for sharing.
Building a website is indeed a journey, not a sprint. Your reminder to take it step by step and not get overwhelmed is pure gold.